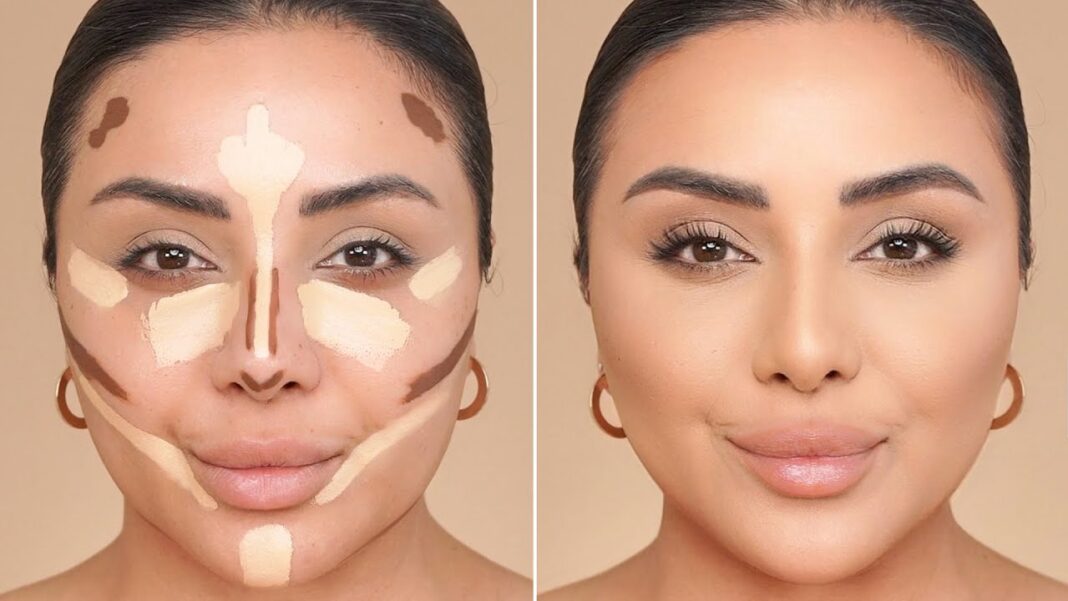
Contouring is a makeup technique that uses light and dark shades to define and sculpt the face. For those with round faces, contouring can help add definition, enhance cheekbones, and create the illusion of a more oval or elongated shape. If you’re a beginner, learning how to contour a round face may seem overwhelming, but with the right steps and products, you’ll be mastering the technique in no time.
In this guide, we’ll break down contouring into simple steps specifically tailored for round face shapes. You’ll also find a helpful table for product placement and answers to common questions at the end.
Understanding a Round Face Shape
Before jumping into contouring, it’s essential to understand your face shape. A round face typically has the following characteristics:
- Equal width and length
- Soft jawline with minimal angles
- Fuller cheeks
- Rounded chin
The goal of contouring a round face is to create structure by adding shadows to the sides of the face and highlighting the center to draw attention vertically.
Tools and Products You’ll Need
To contour effectively, gather these essentials:
- Contour product (cream or powder) 1–2 shades darker than your skin tone
- Highlighter (1–2 shades lighter than your skin tone)
- Blush (optional but helpful for warmth)
- Foundation (matching your skin tone)
- Makeup brushes or beauty sponge
- Setting powder or spray
Step-by-Step Guide: How to Contour a Round Face
Follow these simple steps to contour a round face for a natural, defined look:
1. Start with a Smooth Base
Cleanse and moisturize your face. Apply your favorite foundation evenly to create a blank canvas. For mature skin, opt for hydrating foundations or even Anti-Aging Night Creams for Women Over 40 at night to prep your skin long-term.
2. Map Out Your Contour
Using a contour stick or powder, apply product to the areas where you want to create shadows:
- Sides of the forehead – to reduce roundness and give a narrower look
- Below cheekbones – suck in your cheeks to find the natural hollows
- Jawline – to add structure and lessen roundness
- Sides of the nose (optional) – for a slimming effect
3. Apply Highlight
Use a lighter concealer or highlighter to bring forward the high points of your face:
- Center of the forehead
- Under the eyes in a triangle shape
- Bridge of the nose
- Chin
- Above the cheekbones
4. Blend Thoroughly
Using a damp beauty sponge or blending brush, blend the contour upwards into the hairline and along the jawline. Blend highlight outward for a seamless finish. The key is to avoid harsh lines.
5. Add Blush and Set
Apply a soft blush slightly above the contour line to lift the cheeks. Then use setting powder or spray to keep your makeup in place all day.
Product Placement Cheat Sheet
| Product | Where to Apply | Purpose |
|---|---|---|
| Contour | Sides of forehead, under cheekbones, jawline | Adds shadows to sculpt and slim face |
| Highlight | Center forehead, under eyes, nose bridge, chin | Brightens and brings forward features |
| Blush | Above contour line on cheeks | Adds color and enhances cheekbones |
| Setting Powder | Over entire face or under eyes | Sets makeup and reduces shine |
Common Mistakes to Avoid
Here are a few beginner mistakes and how to avoid them:
- Using the wrong shades: Always choose contour products 1–2 shades darker and highlighter 1–2 shades lighter than your skin tone.
- Not blending enough: Harsh lines make contour obvious. Blend until everything looks seamless.
- Applying too much product: Start with less; you can always add more.
- Wrong placement: Keep contour higher on the cheeks to lift the face rather than drag it down.
Tips Specifically for Round Faces
- Keep contour lines lifted. Avoid placing contour too low on the cheeks.
- Use vertical highlighting to elongate the face.
- Avoid circular motions when applying blush—opt for upward strokes instead.
- Use matte contour products to avoid adding fullness with shine.
FAQs: Contouring a Round Face
Q1: How can I find out if I have a round face?
A round face has similar width and height with full cheeks and a soft jawline. Looking at your face in the mirror or taking a photo straight-on can help determine this.
Q2: Cream or powder contour – which is better for beginners?
Cream contour is often easier to blend and looks more natural, making it great for beginners. Powder contour offers more precision and is ideal for oily skin.
Q3: Can contouring make my face look slimmer?
Yes. Contouring strategically adds shadows and highlights that create the illusion of a slimmer and more sculpted face.
Q4: Do I need to contour every day?
No. Contouring is optional and best used when you want a more defined look, such as for events, photos, or nights out.
Q5: Can contouring replace weight loss in the face?
Contouring doesn’t change your face shape permanently, but it can visually slim and define your features temporarily with makeup.
Final Thoughts
Learning how to contour a round face for beginners doesn’t have to be complicated. With the right products and techniques, you can add definition and structure to your face in a few easy steps. Remember that makeup is about enhancing your features—not hiding them. As you practice, you’ll discover the best angles, tools, and placements that suit your unique face.
Take your time, start light, and blend well. Whether you’re doing a full glam look or just adding subtle definition, contouring is a valuable skill that anyone can learn—with a little practice and patience.


